English
 日本語
日本語
 Español
 Deutsch


To clean an electric shaver head, rinse it under warm running water after every use, then perform a deeper weekly clean by removing the head, tapping out loose hair clippings, brushing the inner components with the included cleaning brush, and rinsing all parts thoroughly before allowing them to air dry completely. For a monthly deep clean, use a drop of liquid hand soap or a small amount of isopropyl alcohol to dissolve oil and bacteria build-up. This guide covers every method in detail — from daily quick rinses to full disassembly deep cleans — along with a comparison of foil versus rotary shavers, the best cleaning products to use, and answers to the most common questions.
Content
- Why Cleaning Your Electric Shaver Head Matters
- Foil Shaver vs. Rotary Shaver: How Cleaning Differs
- Daily Quick Clean: After Every Shave
- Weekly Deep Clean: Full Disassembly Method
- Monthly Sanitizing Clean: Killing Bacteria and Removing Oil Build-Up
- Best Cleaning Products for Electric Shaver Heads: Compared
- How Often Should You Clean Your Electric Shaver Head?
- How to Lubricate an Electric Shaver Head After Cleaning
- Signs Your Electric Shaver Head Needs Immediate Cleaning or Replacement
- Automatic Cleaning Stations: Are They Worth It?
- Common Mistakes to Avoid When Cleaning an Electric Shaver Head
- Frequently Asked Questions
- Q: Can I use water to clean any electric shaver head?
- Q: How do I clean an electric shaver head without the cleaning brush?
- Q: How long does it take for an electric shaver head to dry after cleaning?
- Q: Can I clean an electric shaver head with hand sanitizer?
- Q: Why does my electric shaver smell bad even after cleaning?
- Q: How do I know when to replace the shaver head instead of just cleaning it?
- Q: Is it safe to clean an electric shaver head while it is charging?
- Conclusion: Build a Three-Tier Cleaning Routine
Why Cleaning Your Electric Shaver Head Matters
A dirty electric shaver head is one of the most common reasons for skin irritation, razor bumps, and a declining quality of shave. When hair clippings, dead skin cells, natural skin oils, and shaving cream residue accumulate inside the shaver head, several problems develop simultaneously.
First, the cutting blades and foils become clogged, which forces the motor to work harder and increases friction against the skin — leading directly to irritation, redness, and ingrown hairs. Second, the accumulated organic matter becomes a breeding ground for bacteria. Research published in dermatology journals has found that unwashed shaver heads can harbor thousands of bacteria per square centimeter after just a few days of use, increasing the risk of folliculitis and skin infections.
Third, and perhaps most overlooked from a practical standpoint, a dirty electric shaver head wears out significantly faster. The additional strain placed on the motor when blades are clogged shortens both blade life and battery life. Studies from shaver manufacturers show that users who clean their shaver heads after every use extend blade life by up to 60% compared to users who clean weekly or less. Regular cleaning is not just a hygiene habit — it is a cost-saving measure.
Foil Shaver vs. Rotary Shaver: How Cleaning Differs
Foil shavers and rotary shavers require different cleaning approaches because their internal structures trap hair and debris in fundamentally different ways. Understanding which type you own is the essential first step before cleaning.
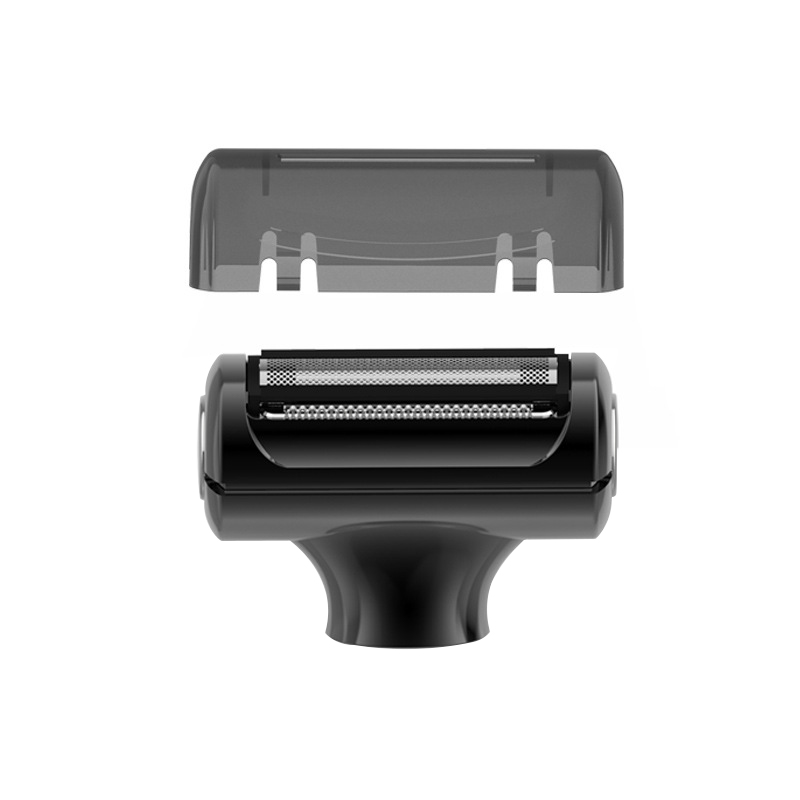
A foil shaver has a thin, perforated metal screen (the foil) stretched over one or more straight oscillating blades beneath it. Hair enters through the perforations in the foil and is cut by the reciprocating blade underneath. Debris accumulates primarily between the foil and the blade, and — because the cutting system is linear — it is relatively easy to tap out and brush clean.
A rotary shaver has two, three, or sometimes four circular cutting heads, each containing a spinning cutter beneath a circular guard. Hair is drawn into the slots in the circular guard and cut by the spinning blade below. Because the cutter is circular and spins at high speed, hair clippings tend to pack more tightly into the cutter assembly, often requiring more thorough rinsing or disassembly to clean properly.
| Feature | Foil Shaver Head | Rotary Shaver Head |
| Cutting element | Linear oscillating blade under foil screen | Spinning circular cutter under round guard |
| Where debris collects | Between foil and blade; easy to tap out | Inside cutter hub; packs tightly |
| Quick-rinse effectiveness | Very good | Good; longer rinse recommended |
| Ease of disassembly for deep clean | Moderate — foil is fragile | Easy — heads pop off individually |
| Foil/guard fragility | High — foil dents easily | Lower — plastic guard is robust |
| Brush cleaning suitability | Good for blade; avoid foil | Excellent for all surfaces |
| Recommended clean frequency | After every use (quick); weekly (deep) | After every use (quick); weekly (deep) |
Table: Key differences between foil and rotary electric shaver heads that affect how each should be cleaned.
Daily Quick Clean: After Every Shave
A 30-second rinse under warm running water after every shave is the single most impactful cleaning habit you can build for your electric shaver head. Done consistently, this one step prevents the majority of debris build-up and eliminates the need for aggressive deep cleaning sessions.
For Waterproof Shavers (Wet/Dry Models)
- Turn the shaver on while holding it under warm running water. Running the motor while rinsing allows the oscillating or spinning blades to actively flush out trapped hair clippings — this is significantly more effective than rinsing a switched-off shaver.
- Hold under the stream for 20 to 30 seconds, rotating so water flows through the shaver head from multiple angles.
- Turn the shaver off and give the head a gentle tap against your palm to dislodge any remaining loose clippings.
- Shake off excess water and leave the shaver head open or detached in a well-ventilated area to air dry. Never store a wet shaver head in a closed case — moisture trapped in the cutting chamber promotes corrosion and bacterial growth.
For Non-Waterproof Shavers (Dry-Only Models)
- Never submerge or rinse a dry-only shaver under water — doing so will cause electrical damage and void the warranty. Check the shaver's IPX rating: a rating of IPX4 or lower means the shaver is splash-resistant at most, not waterproof.
- With the shaver off, tap the head gently against your palm or the edge of the sink to knock out loose hair.
- Use the small cleaning brush that came with the shaver (or a soft toothbrush) to sweep clippings out of the cutting area. For foil shavers, brush the inner blade lightly in a side-to-side motion — never brush directly on the foil screen, as the thin metal is easily dented.
- Use a can of compressed air if available — a 1-second burst directed into the shaver head dislodges fine hair particles and skin debris that brushing alone may miss.
Weekly Deep Clean: Full Disassembly Method
A weekly deep clean using full disassembly is essential for removing the oil, dead skin cells, and compacted hair debris that daily rinsing cannot reach. This process takes approximately 5 to 10 minutes and significantly extends blade life and shaving performance.
What You Need
- Cleaning brush (supplied with shaver, or a soft-bristle toothbrush)
- Warm water
- Liquid hand soap or dedicated shaver cleaning solution
- Isopropyl alcohol (70%) — optional, for sanitizing
- Clean dry towel or microfiber cloth
- Shaver lubricating oil — optional but recommended
Step-by-Step: Deep Cleaning a Foil Shaver Head
- Unplug or power off the shaver completely before disassembly.
- Remove the shaver head frame by pressing the release button or sliding the frame off according to your model's instructions. The foil screen and blade cassette should now be accessible.
- Carefully lift the foil screen away from the blade cassette. Handle the foil by its plastic frame only — never touch the thin metal foil mesh with your fingertips, as oils from skin can cause corrosion, and even light pressure can dent it permanently.
- Tap the blade cassette gently over a sink or waste bin to remove loose clippings.
- Brush the blade cassette with the cleaning brush using short, even strokes. Do not brush the foil screen — instead, hold the foil under warm running water and let the water flow do the work.
- If the shaver is waterproof, add one small drop of liquid hand soap to the foil and blade separately and rinse under warm water for 20 to 30 seconds each. The soap dissolves skin oil and product residue that water alone cannot remove.
- Rinse all parts thoroughly with clean warm water to remove all soap residue. Soap left on the cutting elements will degrade the metal over time.
- Air dry completely — lay parts on a clean dry towel for at least 30 minutes before reassembling. Reassembling a wet shaver traps moisture inside, accelerating corrosion.
- Apply one drop of shaver oil to the blade before reassembling. This reduces friction between the foil and blade, extends component life, and improves glide on the next shave.
- Reassemble carefully — align the foil frame and snap it securely back into position.
Step-by-Step: Deep Cleaning a Rotary Shaver Head
- Power off and remove the head assembly by pressing the release mechanism. Most rotary shavers have a single button that releases the entire circular head frame.
- Pop each individual cutter head out of the frame. Rotary cutter heads typically lift straight out; they are color-coded or numbered so you can return each to its original position — important, because blades and guards wear together and should not be mixed between positions.
- Rinse the cutter frame under warm running water, brushing any trapped hair from the slots with the cleaning brush.
- For each individual cutter unit, hold it under warm running water and use the cleaning brush to work out compacted hair from around the circular blade. Rotate the cutter by hand under the water to help dislodge debris from all angles.
- Add a tiny drop of liquid soap to each cutter, work it in briefly with the brush, then rinse thoroughly.
- Inspect each cutter guard for any cracks or damage. A cracked guard can nick the skin — replace immediately if damaged.
- Air dry all components on a clean towel for at least 30 minutes.
- Apply one drop of shaver lubricating oil to the top of each spinning cutter before reassembling.
- Reassemble in the correct order — return each cutter head to its original numbered or colored position in the frame.
Monthly Sanitizing Clean: Killing Bacteria and Removing Oil Build-Up
A monthly sanitizing clean using isopropyl alcohol eliminates bacteria and dissolves the protein and oil deposits that water and soap cannot fully address. This step is particularly important for people with sensitive skin, acne-prone skin, or anyone who has experienced post-shave breakouts.
Isopropyl Alcohol Method
Use 70% isopropyl alcohol — not 90% or higher. At 70% concentration, the alcohol stays in contact with surfaces long enough to effectively kill bacteria. Higher concentrations evaporate too quickly to be fully effective as a disinfectant.
- Disassemble the shaver head as described in the weekly deep clean section above.
- Perform the standard rinse and brush clean first. Alcohol is most effective as a final sanitizing step, not a substitute for physical cleaning.
- Pour a small amount of 70% isopropyl alcohol into a shallow dish. Submerge the metal cutting components (blades and foils or cutter heads) for 30 to 60 seconds.
- Remove and allow to air dry completely — alcohol evaporates quickly and leaves no residue, so no rinsing is required.
- Do not soak plastic components in alcohol for extended periods — prolonged contact can cause some plastics to crack or discolor.
- Apply a drop of shaver oil before reassembling, as alcohol strips any lubrication from the blades.
Best Cleaning Products for Electric Shaver Heads: Compared
The right cleaning product makes a significant difference in how thoroughly and safely you can clean an electric shaver head. The table below compares the most commonly used options.
| Product | Grease Removal | Bacteria Kill | Safe for Metal | Safe for Plastic | Cost |
| Warm water only | Low | Low | Yes | Yes | Free |
| Liquid hand soap | Good | Moderate | Yes | Yes | Very Low |
| Isopropyl alcohol (70%) | Good | Excellent | Yes | Short exposure only | Low |
| Dedicated shaver cleaning solution | Excellent | Excellent | Yes | Yes | Medium |
| Dish soap (degreaser) | Very Good | Moderate | Yes (rinse well) | Yes | Very Low |
| Bleach / harsh chemicals | Not recommended | High | No — corrodes metal | No — degrades plastic | Low |
Table: Comparison of common cleaning products for electric shaver heads rated by cleaning effectiveness, material safety, and cost.
How Often Should You Clean Your Electric Shaver Head?
The ideal cleaning schedule for an electric shaver head combines a daily quick rinse with a weekly deep clean and a monthly sanitizing session. Skipping any of these tiers leads to a build-up of compounding problems: daily skips cause weekly clogs, weekly skips cause monthly bacterial colonies, and monthly skips cause accelerated blade wear.
| Cleaning Tier | Frequency | Time Required | What It Removes | Method |
| Quick rinse | After every shave | 30 seconds | Loose hair clippings, surface debris | Water rinse (motor on) or brush |
| Deep clean | Weekly | 5 to 10 minutes | Packed hair, skin oil, product residue | Disassembly, brush, soap, rinse |
| Sanitizing clean | Monthly | 10 to 15 minutes | Bacteria, protein deposits, fungal spores | Isopropyl alcohol soak or cleaning solution |
| Blade replacement | Every 12 to 18 months | 5 minutes | Worn cutting edges; restores full performance | Replace foil and blade or cutter cassette |
Table: Recommended cleaning schedule for electric shaver heads organized by frequency, time investment, and what each tier removes.
How to Lubricate an Electric Shaver Head After Cleaning
Lubricating the shaver head after every deep clean is as important as the cleaning itself — without adequate lubrication, even a perfectly clean blade will cause friction, skin drag, and premature wear of both the foil and the blade.
The correct approach is to apply a single drop of dedicated shaver lubricating oil to the top of the cutting element before reassembling the head, then run the shaver for 5 to 10 seconds to distribute the oil evenly across all cutting surfaces. Wipe away any excess oil with a clean cloth.
If you do not have dedicated shaver oil, a drop of light mineral oil or pure sewing machine oil works as an effective substitute. Do not use cooking oils, olive oil, or coconut oil — vegetable and plant-based oils go rancid quickly, create sticky residue inside the cutting mechanism, and can promote bacterial growth.
Regular lubrication can extend blade and foil life by an additional 30% to 50% beyond what cleaning alone achieves, according to information provided by shaver component manufacturers.
Signs Your Electric Shaver Head Needs Immediate Cleaning or Replacement
Certain warning signs indicate that your electric shaver head has reached a level of soiling or wear that requires immediate attention — either an emergency deep clean or replacement of the cutting components.
- Tugging or pulling sensation during shaving: This is the most common sign that the blades are clogged. Hair is catching and being pulled rather than cut cleanly. A deep clean will usually resolve this immediately.
- Skin redness or irritation after shaving: When blades are partially clogged, they create uneven pressure and increased friction against the skin — a direct path to razor burn and irritation.
- Noticeable increase in shaver noise: A clean shaver runs quietly and smoothly. An increase in mechanical noise — especially a grinding or buzzing quality — often indicates that packed debris is interfering with the motor or blade movement.
- Visible discoloration or brown residue on blades: Oxidized skin oil and decomposing hair create a brownish film on blades that is a clear indicator of significant build-up. This requires a full deep clean and sanitizing session.
- Unpleasant odor from the shaver head: Any smell coming from the shaver head — even a faint metallic or organic smell — indicates bacterial colonization. Perform an immediate disassembly, soap clean, and alcohol sanitizing session.
- Shave quality does not improve after cleaning: If deep cleaning and lubrication do not restore smooth, comfortable shaving performance, the foils or blades have reached the end of their service life and need replacement. Most manufacturers recommend replacing foils and blades together every 12 to 18 months.
Automatic Cleaning Stations: Are They Worth It?
Automatic cleaning stations that charge and clean your shaver simultaneously are a convenient but not strictly necessary addition to any shaver cleaning routine. They are worth the investment for users who shave daily and want to minimize manual cleaning effort.
These stations work by submerging the shaver head in a proprietary cleaning fluid — typically containing alcohol, lubricant, and fragrance — while running the shaver's motor to flush debris. The cycle usually takes 30 to 60 minutes and leaves the head clean, sanitized, lubricated, and charged.
The main drawback is ongoing cost: the proprietary cleaning cartridges used by most cleaning stations need to be replaced every 1 to 3 months depending on use, adding an annual cost of approximately $30 to $80 per year. The same cleaning result can be achieved manually using the methods described in this guide for a fraction of that cost — with liquid hand soap and isopropyl alcohol costing only a few dollars per year.
Cleaning stations are best suited for users who own a waterproof, wet/dry compatible shaver and who consistently find that manual cleaning feels inconvenient enough to skip. For users who are willing to spend 5 to 10 minutes weekly on a manual clean, the station's benefits do not outweigh its ongoing cartridge costs.
Common Mistakes to Avoid When Cleaning an Electric Shaver Head
Several widespread cleaning mistakes actively damage electric shaver heads, reduce blade life, or create skin health risks — knowing what not to do is just as important as the cleaning steps themselves.
- Rinsing a non-waterproof shaver under water: Always verify your shaver's IPX waterproof rating before any water exposure. A dry-only shaver rinsed under water will suffer immediate electrical damage and is a safety hazard.
- Brushing directly on the foil screen: The thin metal foil on a foil shaver dents and punctures easily. Brush only the blade cassette — clean the foil with water only.
- Reassembling the shaver while components are still wet: Trapped moisture causes corrosion and bacterial growth inside the cutting mechanism. Always air dry fully — at least 30 minutes — before reassembly.
- Mixing rotary cutter heads between positions: Rotary cutter heads and guards wear as paired units. Swapping them between positions introduces mismatched wear patterns that accelerate damage and reduce shave comfort.
- Using bleach, hydrogen peroxide, or abrasive cleaners: These corrode metal blades and degrade plastic components. Stick to soap, water, or isopropyl alcohol.
- Over-lubricating the shaver head: More than one drop of oil is too much. Excess oil attracts dust and hair particles, creating a sticky paste that clogs the cutting system faster than normal use would.
- Ignoring the shaver body and charging contacts: Hair clippings and skin oils settle on the shaver body and charging pins over time. Wipe the body with a slightly damp cloth weekly and clean the charging contacts with a dry cotton swab to maintain reliable charging and prevent corrosion.
Frequently Asked Questions
Q: Can I use water to clean any electric shaver head?
A: Only if your shaver is rated as waterproof — typically indicated by an IPX5 or higher rating on the product label or in the owner's manual. Dry-only shavers must be cleaned with a brush or compressed air only. Running water through a non-waterproof shaver will cause electrical damage and may create a safety hazard. When in doubt, check the IPX rating before any water exposure.
Q: How do I clean an electric shaver head without the cleaning brush?
A: A soft-bristle toothbrush is the best substitute for the included cleaning brush. Use an old toothbrush dedicated solely to shaver cleaning — never share it with dental use. A small paintbrush with soft bristles also works well for reaching into narrow spaces around the blade assembly. Avoid stiff-bristle brushes, which can scratch the foil.
Q: How long does it take for an electric shaver head to dry after cleaning?
A: Most electric shaver head components need a minimum of 30 minutes of air drying time after rinsing before they are safe to reassemble. For maximum safety and to prevent any corrosion risk, allowing 1 to 2 hours of air drying is ideal. You can speed up the process by gently shaking off excess water and placing components on a dry microfiber towel in a well-ventilated area. Never use a hair dryer on high heat — excessive heat can warp plastic components or damage the foil.
Q: Can I clean an electric shaver head with hand sanitizer?
A: Hand sanitizer can be used as an emergency sanitizing measure, but it is not ideal for routine cleaning. Gel-based hand sanitizers contain emollients and thickeners that leave a sticky residue on shaver components. Alcohol-based spray sanitizers are cleaner but still less effective than pure 70% isopropyl alcohol. If hand sanitizer is your only available option, rinse the components thoroughly with water after application and allow to dry fully before reassembling.
Q: Why does my electric shaver smell bad even after cleaning?
A: A persistent odor after cleaning usually indicates a bacterial colony that a standard water-and-soap clean has not fully eliminated. Perform a full disassembly and soak the metal components in 70% isopropyl alcohol for 60 seconds, then air dry completely. If the odor persists after this step, the issue may be inside the shaver body itself — hair clippings and skin oils can work their way into the motor housing over time. In this case, a compressed air blast directed into the body vents may help; if not, the shaver may need professional cleaning or the components may need replacement.
Q: How do I know when to replace the shaver head instead of just cleaning it?
A: Replace the shaver head cutting components when cleaning and lubrication no longer restore smooth, comfortable shaving performance. Most manufacturers recommend replacing foil and blade cassettes every 12 to 18 months, and rotary cutter heads every 12 to 24 months, depending on frequency of use. Other indicators include visible nicks or holes in the foil, a grinding sensation that persists after cleaning, or shaving that consistently requires multiple passes over the same area despite a clean and lubricated head.
Q: Is it safe to clean an electric shaver head while it is charging?
A: No — always unplug the shaver from its charger completely before cleaning, especially before any water contact. Even waterproof shavers with an IPX7 rating should not be rinsed while connected to a power source. The waterproof rating applies to the shaver body under normal operating conditions, not to the charging port or electrical connection. Cleaning a plugged-in shaver is both a safety hazard and likely to cause damage to the charging system.
Conclusion: Build a Three-Tier Cleaning Routine
Knowing how to clean an electric shaver head properly comes down to one core principle: match the cleaning intensity to the frequency of use, and never let debris sit long enough to harden and compact. A 30-second daily rinse, a 10-minute weekly deep clean, and a monthly alcohol sanitizing session form a three-tier routine that keeps your shaver head hygienic, performing at its best, and lasting significantly longer between blade replacements.
Whether you own a foil or rotary shaver, the principles are identical: remove hair mechanically, dissolve oils chemically, sanitize bacterially, lubricate mechanically, and dry completely before storing. Follow these steps consistently and your electric shaver head will deliver a comfortable, close, irritation-free shave for years — not months.
The most important single action? Rinse after every shave. This one habit, done for just 30 seconds, prevents 80% of the problems that result from infrequent cleaning and makes every subsequent deep clean dramatically faster and easier.